Why Learn Masking in Photography?
Selfies and candid images have permeated all aspect of your daily lives in this digital age. Thus, high-quality photographs are essential to internet company when it comes to grabbing users’ attention.
Poor-quality photographs, on the other hand, are more likely to discourage buyers from purchasing your service or product. Unfortunately, even for experienced photographers, taking high-quality pictures can be difficult at times. If so, image masking will help you improve your drab pictures.
The majority of people, however, are not very familiar with picture masking. If it describes you, don’t worry. Here, we’ll talk about what image masking is, how to use it, and why you would want to. For more information about picture masking, keep reading.
What Is Image Masking & Why Do You Need Image Masking?
What Is Image Masking In Photography?
Image masking is crucial to making targeted alterations regardless of the photo editing software you’re using. The goal is the same even though each programme uses a somewhat different method of masking.
You may more precisely control where an image or adjustment layer will be applied in your image by adding a mask to it. In this manner, you can quickly focus on particular regions of your image for a better edit.
There are various types of image masking options available, depending on the photo editing programme you use. You will discover the various kinds and functions of image masking in post-processing in this article.
When you “mask” an image during photo editing, you are limiting the area where a certain adjustment or layer is visible. You can edit a specific area of your image while keeping the rest intact by using a mask.
To brighten your topic, for instance, while leaving the entire background unaltered, you could apply a mask. Simply, selective adjustments allow you fine-grained control over the types and locations of photo editing alterations.
Now that you are familiar with the fundamentals of image masking, let’s talk about it in more detail. Learn more about image masking’s applications, how it functions in various applications, and how to incorporate it into your own workflow in the sections below!
What Is “Masking” An Image?
In order to pinpoint exactly where an adjustment is being made, image masking techniques uses masks or selective modifications. Depending on the photo editing software you use, this may seem slightly differently, but the overall result is the same.
For instance, while masking in Photoshop, you use a specific layer mask. Here, you can choose the transparency of any form of selective modification by utilising the colours black, white, or grey.
Some photos have different hues of colour in the sky. I can control where the correction is seen in the image (in this case, the sky) and how transparent it is by masking the solid colour layer. Observe how the solid colour grows more and more obvious in each iteration of the mask. The layer mask’s various brush and opacity modifications are the direct cause of this.
One of the better examples of a post-processing programme that incorporates masks into the photo editing process is Photoshop. Any sort of layer can have a mask applied to it, allowing you complete control over your image. Let’s speak about another sort of picture masking you can encounter for the time being. We’ll go into more detail about this later in the post-processing.
With selective modifications, image masking is another example. Selective adjustments don’t produce a layer mask that you can view independently of your layer; instead, they just make your photo directly visible. You can isolate your adjustments using a variety of selective adjustments in Lightroom.
These selected modifications, in contrast to Photoshop, can only be utilised for exposure, contrast, or colour adjustments. These masks can’t be used to combine numerous photographs or erase backgrounds from an image because there aren’t any layers.
You’ll encounter masks in the form of specialised layer masks, as in Photoshop, or spot modifications, like in Lightroom, regardless of the editing tool you’re using. Both options do the same thing, but Photoshop’s use of masks in photo editing provides you additional choices.
What Is Image Masking – Types of Image Masking Techniques
There are several types of image masking and they’re discussed below:
Layer Masking
When discussing masking technique in Photoshop, most people typically refer to the layer mask. By employing masking, we can modify the opacity of certain parts of a picture or hide or reveal certain areas of the image. The entire image’s opacity will change if we adjust the opacity of a layer using the layers panel opacity slider.
We can alter the layer’s visibility using the layer mask. Any component can be made entirely or only partially visible. That part of the image will be completely transparent if we paint black on the mask. In other words, it will reveal the layer or layers below.
Depending on the percentage of grey we select for the brush, painting with any grayscale colour will result in a portion of the image becoming translucent. The metamorphosis of the edge will be smoother if we choose a delicate brush.
Clipping Mask
With the aid of clipping masks, one layer can control the transparency or visibility of another layer. We add a layer for clipping masks at the base of the layer to which we’re applying the transparency.
We manage the visibility of the layer above from this bottom layer. If newcomers compare the behaviour of the clipping masks with the layer mask, it could look a little conflicting. It can appear that the clipping mask functions differently from the layer mask.
While using a layer mask, we paint the mask in black to make the layer invisible; yet, when using clipping masks, we are doing the exact opposite.
If the bottom layer contains some pixels in that region, the top layer will be opaque or visible. The pixels on the top layer will be transparent or invisible if the lower layer is empty of pixels.
Alpha Channel Masking

Every image has unique characteristics that can be used for processes like background removal. Therefore, many techniques must be used. Different techniques are needed for various photos. Masking with an alpha channels are a bit more difficult.
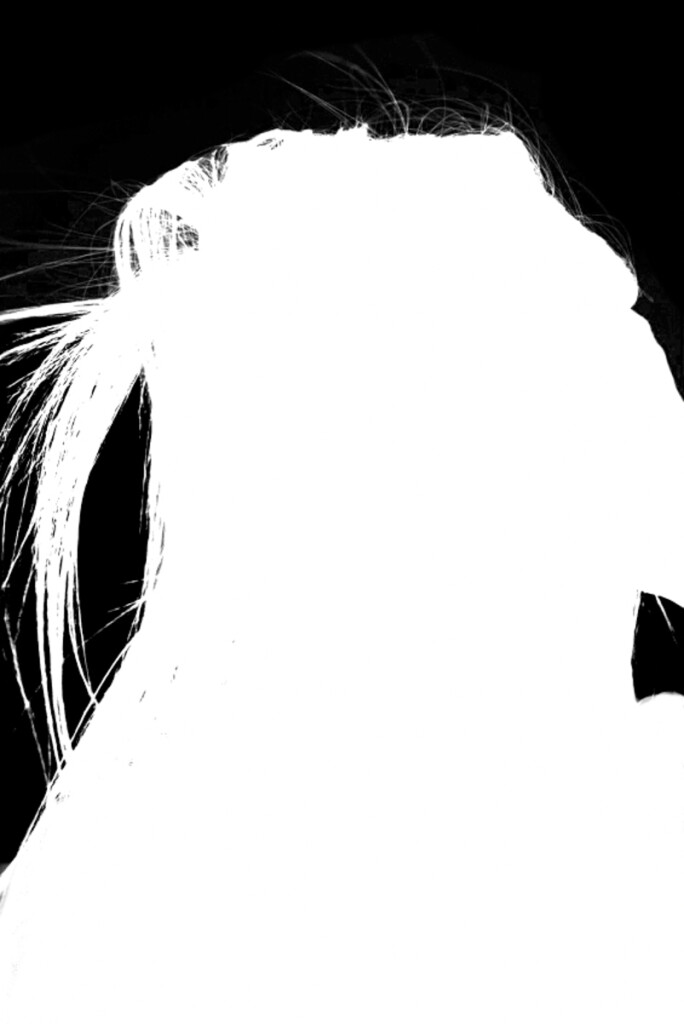
The two methods of masking mentioned above are quite basic. However, it becomes quite challenging and time-consuming to choose those places with just the brush strokes when we need to mask out the hair and fuzzy parts. The alpha channel masking method will be simpler to use if the object and the entire background have enough contrast.
In order to employ this masking technique, we use the channel palette to determine which channel has the most contrast. If it is the blue channel, we duplicate it and then apply the level to it to appropriately boost the contrast. If necessary, we can completely blacken out the interior of the new blue channel by painting over it with black paint.
Then we flip it such that the white becomes black and the black becomes white. To create a new layer, we then copy the channel and paste it into the layer tab. To make the edge areas more contrasted (and the edge fur/hair more black), use the dodge and burn tools.
The Layer>Matting>Color Decontaminate menu also offers the option to apply “Color Decontaminate.” With this choice, you might occasionally get astounding results. Making a copy of the layer is safe before using the colour decontamination method. because the process is harmful.
Just to give you a general notion, below is a basic explanation of alpha channels masking. Let’s now examine the requirement for the masking.
Standard Layer Masking
Using the brush tool and manually painting over your image in Photoshop is the simplest masking technique for an image. You can paint anywhere on your photo to isolate its transparency by using black (100 percent invisible) and white (100 percent visible) paint.
For instance, you could use this method to only darken the sky in an image by creating a new brightness adjustment layer and adjusting the mask to only be visible in the sky.
You’ll utilise this type of masking in every image you work on because it is the most typical one used in Photoshop. With simply your brush tool, it offers a quick and easy way to control exactly where an adjustment or layer is shown.
Vector Masks
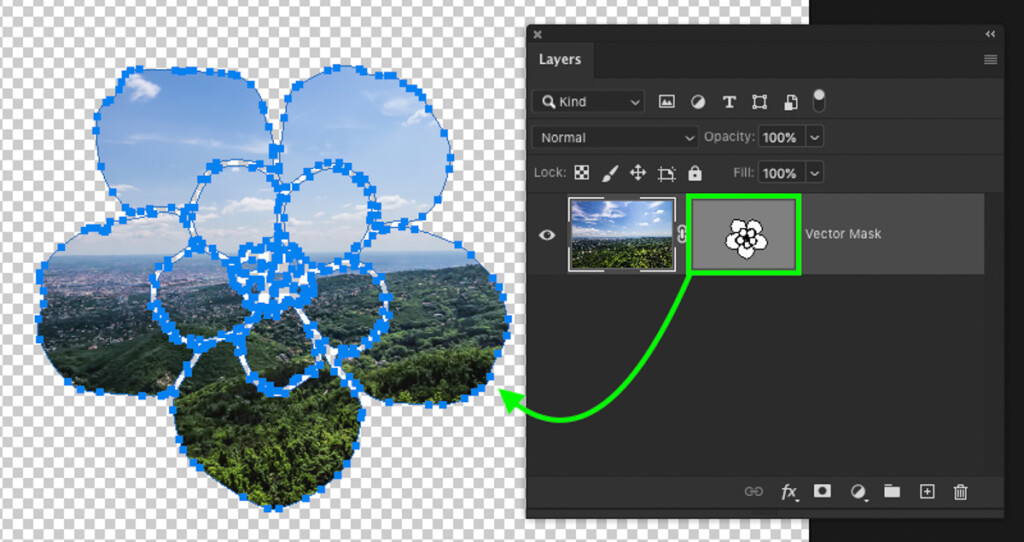
Understanding the distinction between a rasterized layer and a vector layer is essential before one can appreciate the benefits of vector masks. In graphic design, vector masks are employed to keep your image’s edges sharp.
Vector masks are routes with anchor points that are constructed using the pen tool or shape tool rather than pixel-based masks, which are reliant on resolution.
When exporting files as PNG or SVG files while working with text or graphics, utilising vector masks preserves a crisper edge. They are less frequently employed for selective edits and basic photo editing. Vector Masks still play a crucial role in Photoshop’s masking, though.
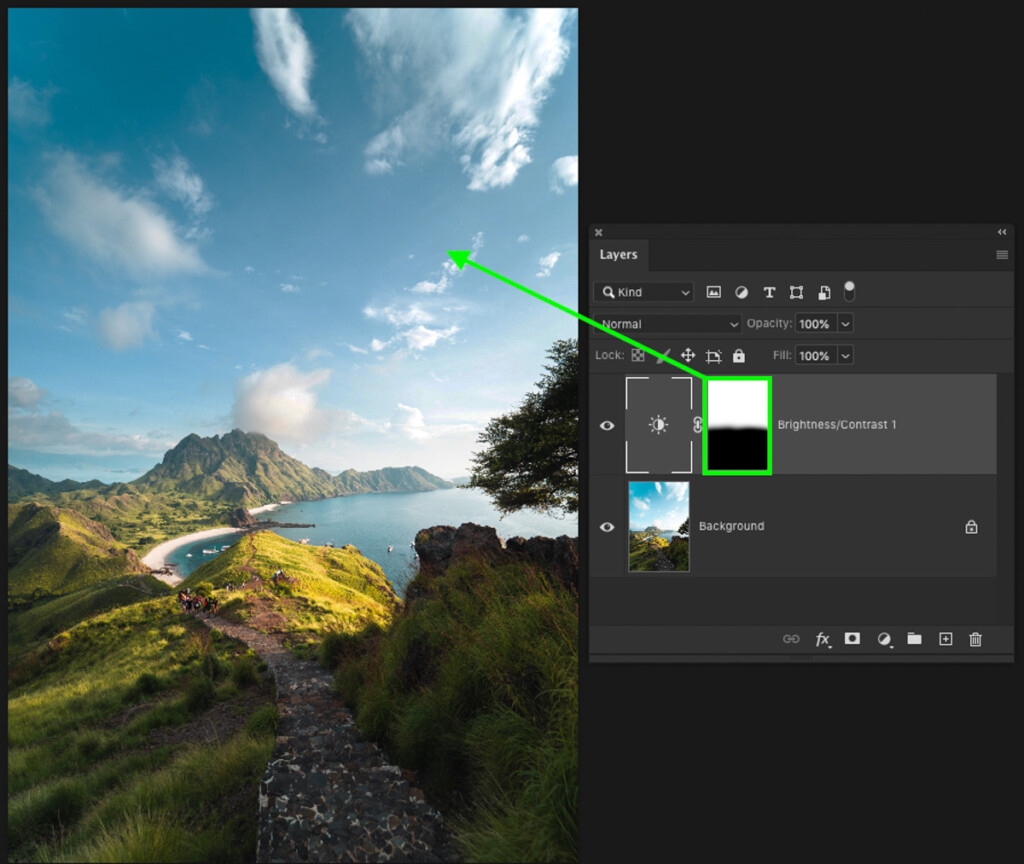
Gradient Masks
Gradient masks are the final type of mask in Photoshop. These resemble regular layer masks, except instead of fine-tuning your layer mask with the brush tool, you use a gradient mask adjustment.
As a result, blending modifications have a special advantage because visibility and transparency can shift smoothly. You may, for instance, make a portion of your layer transparent or aid in blending an adjustment close to the edge of your image.
Applying a Gradient Tool adjustment to a layer mask produces gradient masks. On a layer mask, you may make seamless transitions by using black and white in your gradient mask.
Benefits of Masking
It Is a Non-Destructive Technique
A non-destructive process is masking. Anytime we need to, we can adjust our masks or make changes afterwards. However, if we remove the undesired regions, it will be challenging to add them back if we require them at a later stage of photo editing.
The same holds true if we remove a piece of the image-making process from them. It won’t be simple for us to integrate more nearby areas. By employing the masking approach, it might be able to conceal a portion of what we’ve taken off. So, it is difficult to avoid disguising once more, right?
Just to Hide and Show
As I’ve already explained, masking is most commonly used to hide and reveal specific areas of different images. When masking, if we use a very soft brush or gradient, we can create a transition effect. We can sometimes create transparency of certain parts of an image, like a really shiny sky.
Simply by painting a grey hue over the area, we can, if we so choose, make a very bright sky area dimmer (thereby making the area semi-opaque). Although there are various ways to accomplish this, you can want to use this simple and practical method.
To Modify an Area of a Picture
It happens frequently that you need to edit a portion of the photograph. For instance, you might want to alter the colour of a model’s top clothing. By making that area visible, you can create a mask. Following that, you can make any selective adjustments you desire, including exposure correction, brightness/contrast adjustment, and colour correction.
Removing / Replacing Background of Translucent Objects
The masking method can be used to get rid of translucent items’ backgrounds. Using this, the backdrop of glass-type objects can be removed. This technique can be used to change the background of a transparent piece of muslin or mesh material.
Making Collage Images
By employing the masking technique, we may create captivating collages with different images. The options for creating collages are truly limitless. By applying masking to a variety of photographs, we can create some fascinating effects. The transitions will be seamless if you use soft brushes and grey gradients.
Masking Adjustments In Lightroom
Adjustments are not made in Lightroom using layers or specific masks. Lightroom, on the other hand, makes use of selective modifications, which apply masks directly to a picture. This kind of masking is frequently used in programmes without layers.
1. Selective Adjustment Brush Masks
The Selective Adjustment Brush is the main tool for masking in Lightroom. Using this tool, you can paint a selection region over your image to isolate particular adjustments. Despite being referred to as “selected” changes, it is really just another way to disguise.
You can modify the hardness, flow, and opacity of your brush tool with the selective adjustment brush to better blend in alterations. This device is ideal for performing more exact modifications without disturbing the surroundings.
2. Gradient Filter Masks
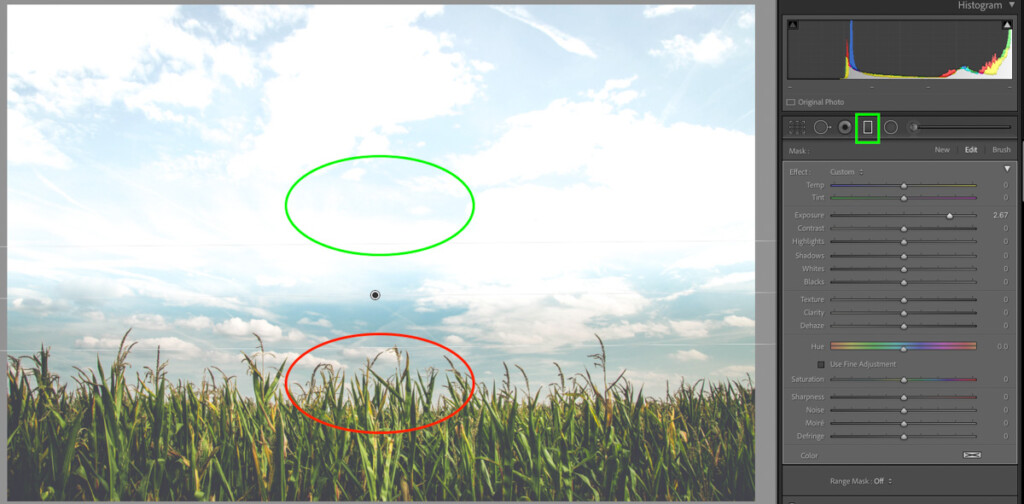
The gradient filter applies a mask to your image similarly to the selective adjustment brush tool, except it does it in the shape of a gradient rather than a brush tool. This has a significant benefit for adjusting any aspect of your photo’s exposure, contrast, and colour in a well-balanced manner.
Gradient filter masks are the ideal solution when you want to selectively alter the sky or darken the boundaries of an image.
Gradient filters in Lightroom change the visibility of an adjustment from 100% visible to 100% transparent. As shown in the sample below, the brightness change is completely transparent on one side of the gradient while being very obvious on the other.
3. Radial Filter Masks
You may make gradient-styled masks with radial filter masks, but only in circular form. This technique is ideal for emphasising a certain region of your photograph or brightening the area around your subject.
You can modify either the inner or outer portion of the radial mask with this masking adjustment. You will then have more options and control over how your mask will effect your image.
In Lightroom, range masks are a remarkably potent tool that let you fine-tune specific adjustment masks based on colour or brightness values.
The benefit of this is that you can tweak more precisely without unintentionally affecting nearby sections. The ability to isolate an adjustment and obtain a more focused edit for your image is greatly enhanced by this.
4. Auto Masks
Another tool that can be used in conjunction with the selective adjustment brush is auto masks. Auto Mask samples the colour and exposure values close to your brush to fine-tune your mask rather than allowing your adjustment to flow over the edges.
An auto mask would make sure that your selection doesn’t spill over the edges if you were to mask along the edge of a structure or the pinnacle of a mountain.
What Are Masks Used For In Photo Editing?
The location of an editing adjustment in a photo can be managed with masks. They can be used to make specific areas of an image fully translucent or to fine-tune your correction along a particular edge.
Masking has a wide range of applications in photo editing, including:
- Removing Backgrounds
- Applying Selective Adjustments
- Blending Multiple Images
- Confining An Image Into A Shape
- Adding Transparency To An Image
Making specific sections of your photo stand out during photo editing would not be feasible without the use of masking. It would be challenging to make the same photo editing tweaks to both the foreground and background of your RAW image, for instance, if the backdrop is brighter than the foreground. The foreground needs different changes than the brighter background because it is so dark.
You may easily target the darker regions of your shot while keeping the lighter areas unaffected through image masking.
By utilising various masks, you are able to produce an edit that is more balanced and professional-looking than you could have done without them.
How Do You Mask A Picture?
How precisely do you mask an image now that you understand what image masking in post-processing is all about? Let’s walk through an image masking example in each programme as we have been talking about image masking in Photoshop and Lightroom thus far.
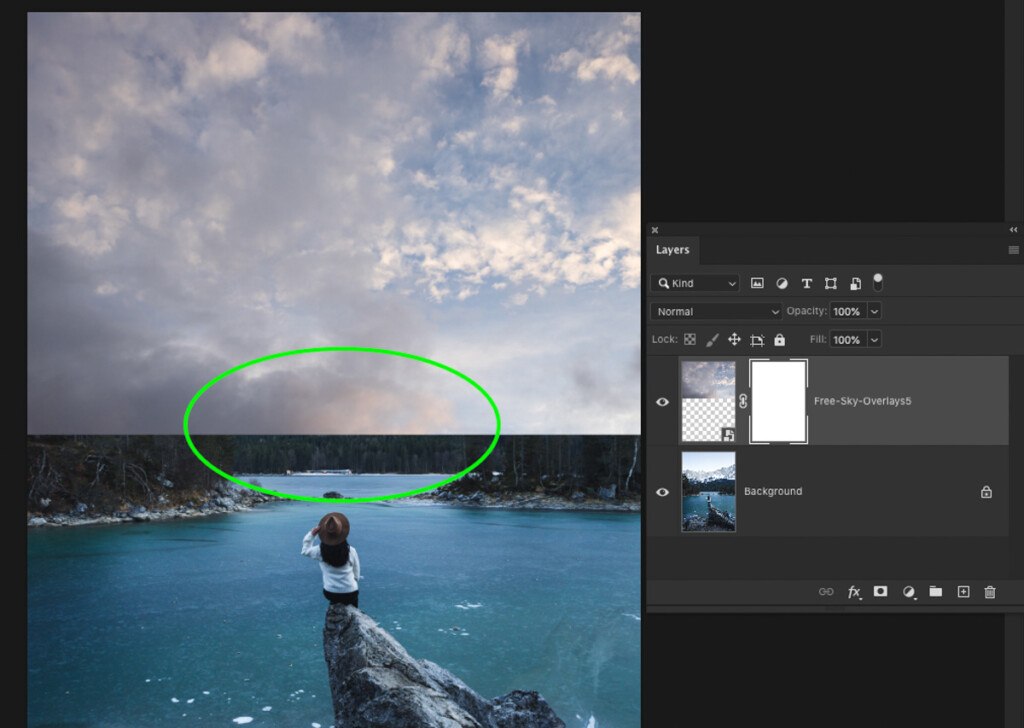
How To Mask In Photoshop
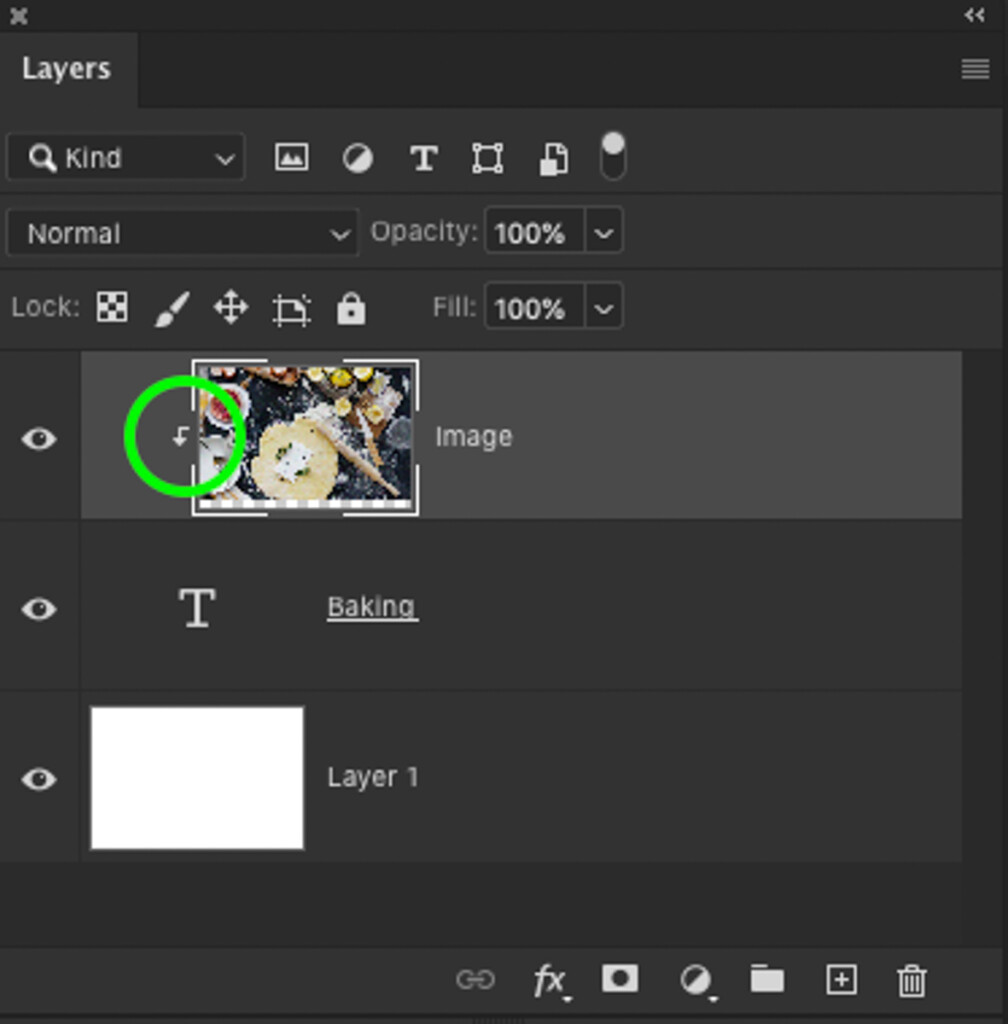
Step 1: Create A New Layer Mask On Your Layer
The creation of a mask is a prerequisite for any selective adjustments in Photoshop. Click on the mask icon at the base of your Layers Panel after selecting the layer you want to mask.
Your new mask’s default setting of white denotes that everything is visible. The mask can be painted black to create transparency in the following stage.
Step 2: Adjust Your Layer Mask With A Black Brush
Make sure black is selected as your foreground colour after that. Black is completely transparent in the realm of layer masks, so painting it on your white mask will make parts of the layer invisible.
To make sure your mask is chosen, click on it. In this manner, the mask will get all of the brush modifications you make on your canvas.
The sections of the layer you desire to become invisible will now be painted over.
Step 3: Refine Your Layer Mask To Blend Your Adjustment
To blend your adjustment, refine your mask in step three.
The sections of your new layer that you want to make invisible continue to be painted over. You can change the brush settings if necessary to acquire different effects. For masking in Photoshop, I would suggest employing a gentle round brush.
You can see that black has been painted over the white by looking at the mask. This shows where your layer is transparent or visible (white) (black).
The sky has quickly been merged into the image after going through and masking out all the necessary regions.
How To Mask In Lightroom
Step 1: Choose A Selective Adjustment
There are several masking options in Lightroom, as you already know. I’ll make my mask using the selective adjustment brush to keep things straightforward.
I can modify the brush parameters after choosing the adjustment brush tool in order to create the mask that I want. I’ll just use a light feather since I want to create a general mask that encompasses the subject of my image.
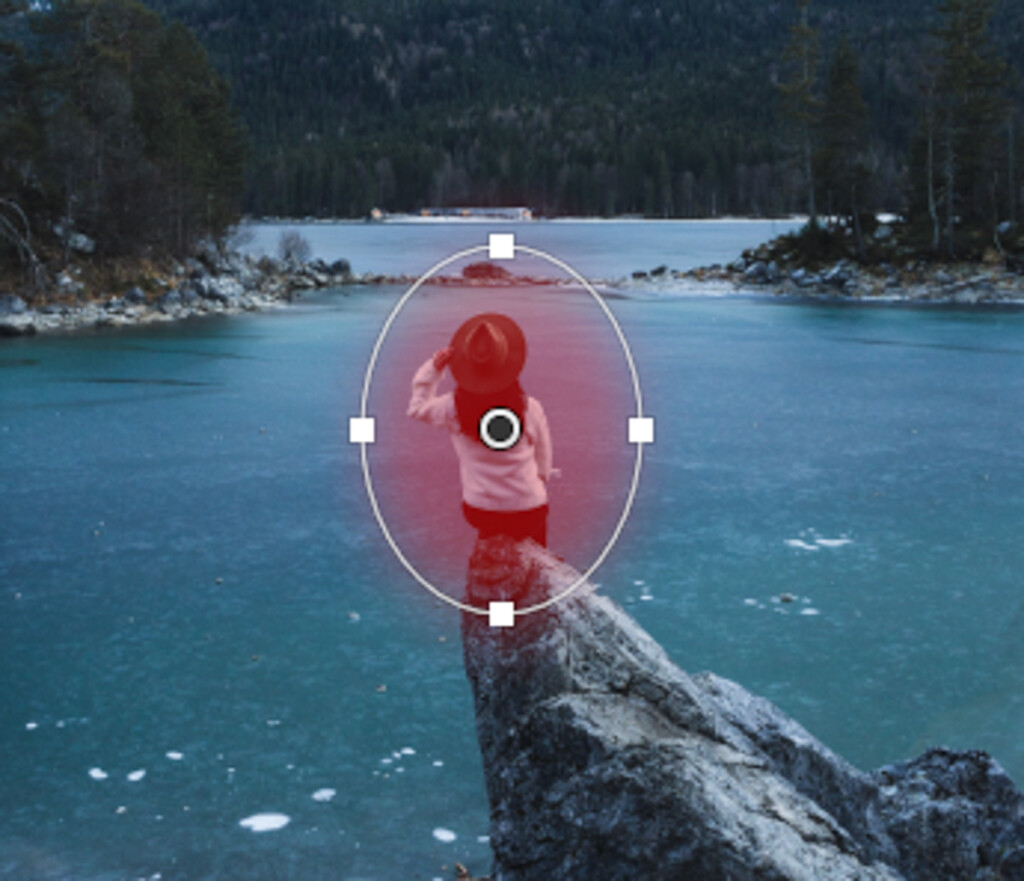
Step 2: Create Your Mask
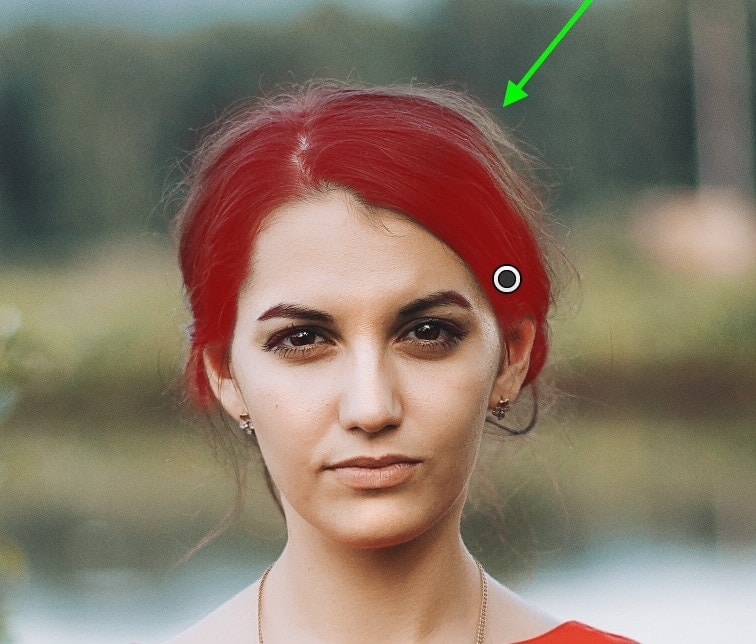
It’s time to make the mask now that the tool parameters are correct. The adjustment brush will start to paint a mask over the subject. The masking area won’t be visible by default, but you can hit O to make it so.
Your masking region is indicated by the red highlight you see. You will include everything inside of this red accent in your modifications.
Pressing Alt or Option will switch to your eraser if you unintentionally mask an area that you don’t want to be affected. You may perfectly refine your mask to any edge by alternately adding to it and subtracting from it.
Step 3: Apply Selective Adjustments To The Masked Area
Once you’ve finished masking, all that’s left to do is make the necessary edits to the masked region. In Lightroom, everytime you apply selective adjustments, a new settings bar will show up. You can edit the colour, contrast, and exposure here, but only the masked area will see the changes.
I will slightly raise the exposure slider in order to brighten the subject.
The figure has now been lightened, but the rest of the image hasn’t changed.
This masking method in Lightroom can be applied to a variety of modifications. Even better, you can modify an image with as many selective adjustments as you choose. Each selective modification will appear as a little grey dot on your image instead of being seen in a layers panel like Photoshop.
Final Thoughts on Learning What is Image Masking
Now that you are aware of what image masking is in post-processing and how it alters photo editing, read on. Without masking, getting the styled alterations you want would be very difficult. Masking is a crucial component of photo editing.
These kinds of modifications are available in any photo editing programme of moderate to professional level. The same concept is applicable to every other photo editing software, even though we just spoke about masking in terms of Photoshop and Lightroom. You may apply kick-butt changes to multiple images in any programme by remembering these methods and suggestions!