Why learn How To Get Rid of White Backgrounds in Photoshop?
What can you do with Photoshop? There are various reasons why you would wish to take away an image’s white background. It’s possible that you lack a transparent version of your logo or that you require a product cutout in order to construct a composite.
Thankfully, there are several choices available in Adobe Photoshop for eliminating a white background. Actually, with a little effort and Photoshop, you can eliminate any sort of background.
First, let’s focus on getting rid of a white (or solid color) background. Your choice of tool and method will be influenced by the overall color and quality of the image.
Use the simple Background Eraser or Magic Eraser tools if the picture that has to be taken away includes dark colors and no bright hues.
To avoid accidentally erasing crucial portions of the image, you will need a more precise tool for photographs with bright colors or backgrounds with fine details.
In this article, we’ll demonstrate how to use the Magic Eraser, background Eraser, and Quick Selection tools to get rid of an image’s background.
How to Remove a White Background in Photoshop
Removing A White Background Using The “Remove Background” Button
Before continuing, it’s crucial to understand that this function is only accessible in Photoshop CC 2020 and newer. As a result, you should move on to the next white background removal option in the list if you are using an earlier version of the application.
This little button, which can be found in the properties panel, makes a selection and applies it to a layer mask automatically. With only one click, you can do things like chop off a picture and make a white background transparent. There are no challenging manual selections needed!
Step 1: Select Your Image Layer
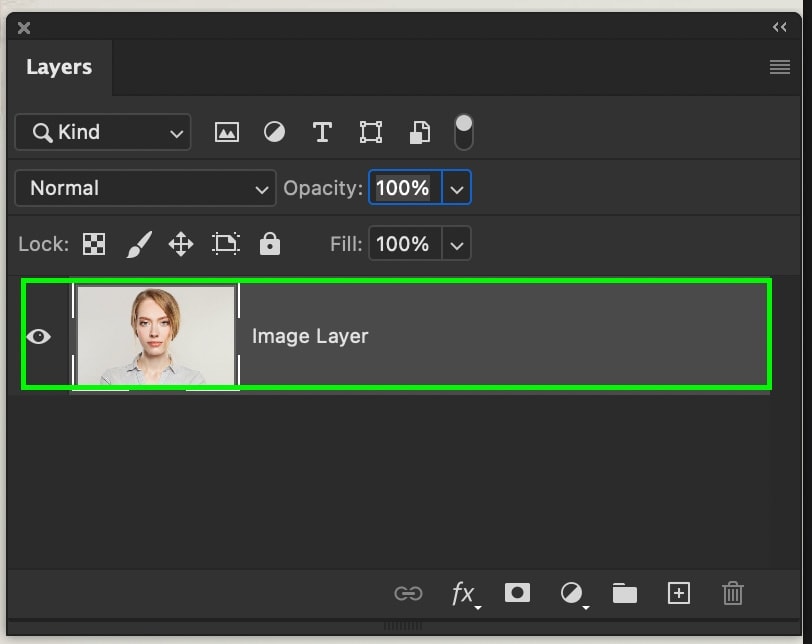
Make sure your picture layer is first chosen and unlocked in your Layers Panel.
Step 2: Open The Properties Panel
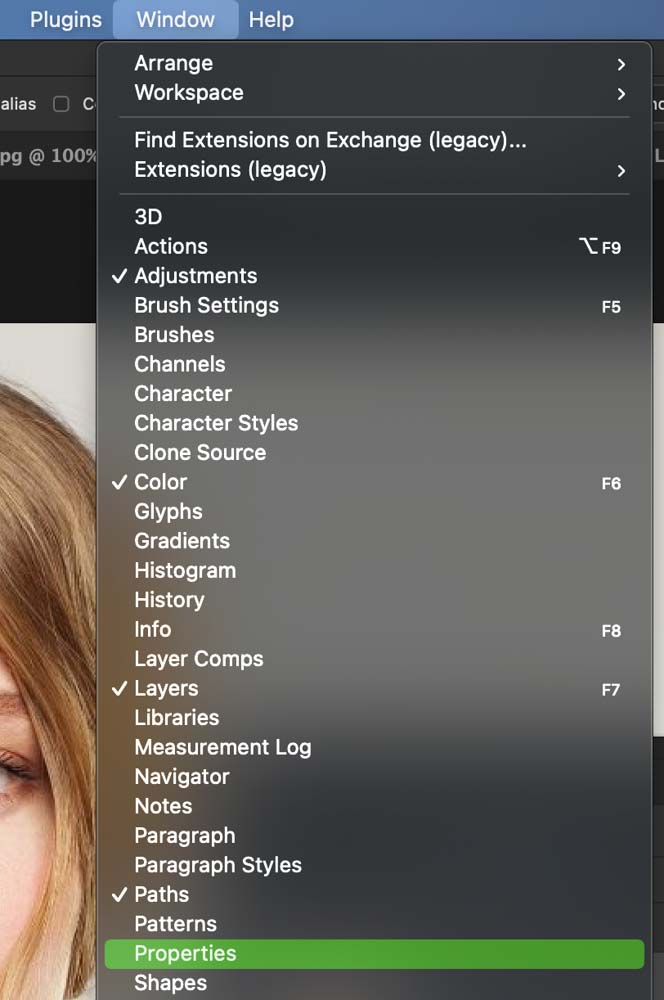
Go to the properties panel by going up now. Go to Window > Properties to display the panel if you can’t see it.
Step 3: Click On “Remove Background”
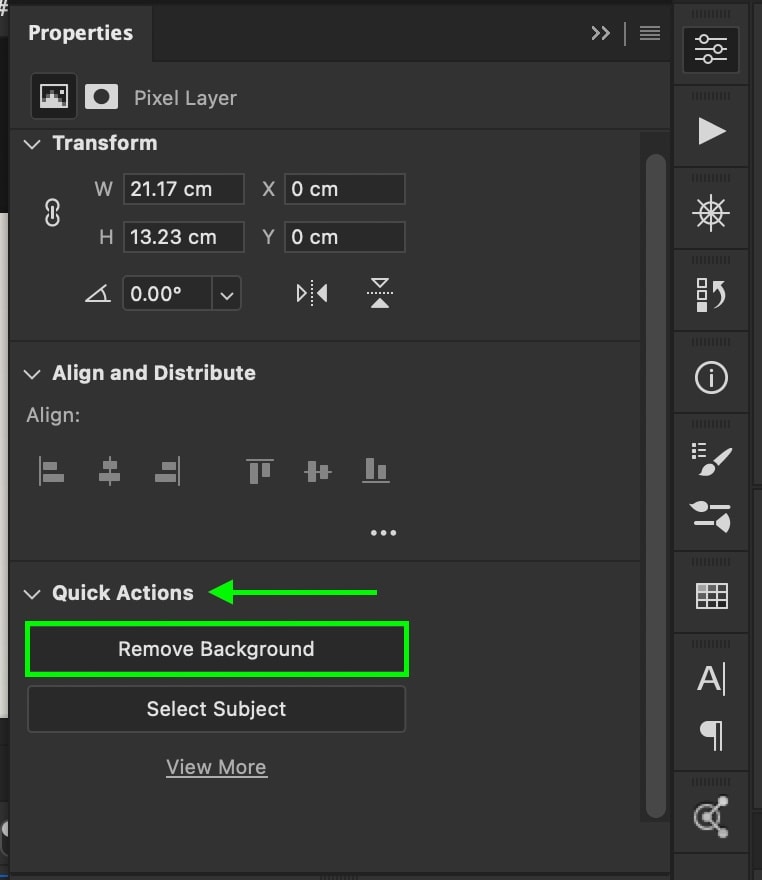
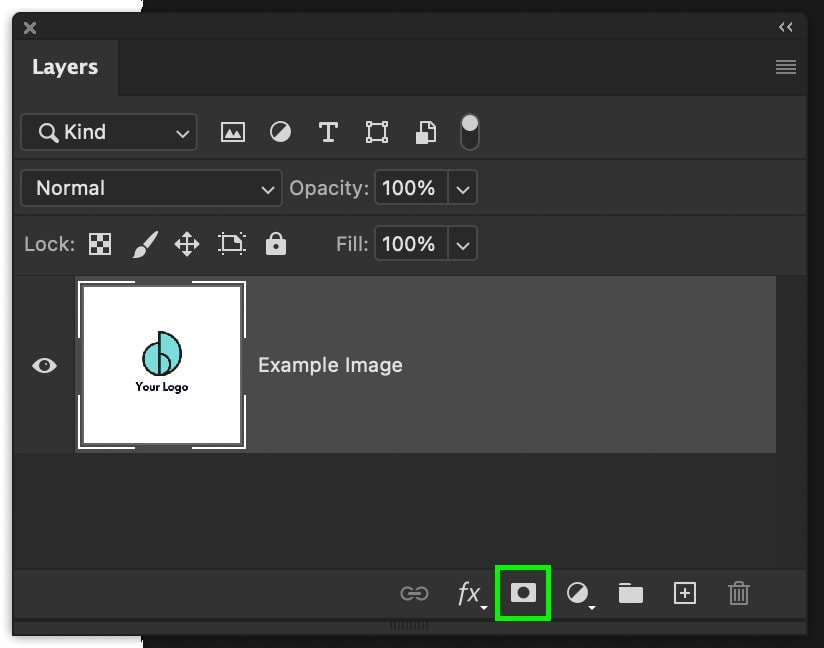
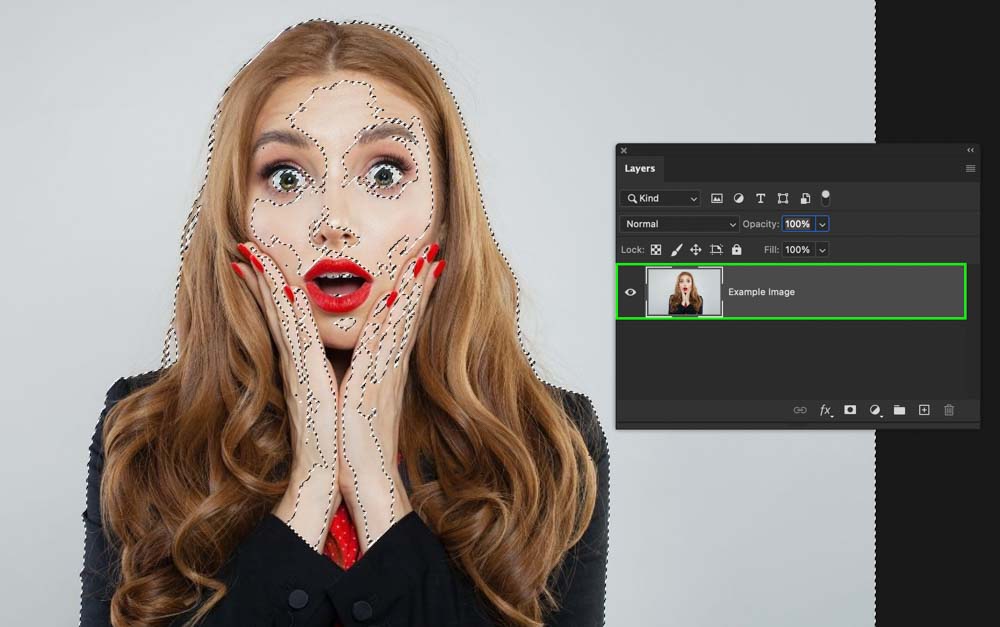
Look for the Quick Actions choices by scrolling to the bottom of your properties panel. Two buttons labeled “Remove Background” and “Select Subject” are located there.
By using the Remove Background button, a selection will be made around your subject, which will then be applied to a layer mask. One click produces a cut out picture with a translucent background!
The Select Subject button, on the other hand, automatically makes a selection around your subject without using a mask. In the event that something goes wrong during the choosing procedure, you may immediately adjust it this way.
I’ll select the “Remove Background” button as I want to complete this as quickly and with as few clicks as possible.
Photoshop will automatically make a selection around your topic and eliminate the white background using its magic.

Step 4: Refine The Newly Created Layer Mask If Needed
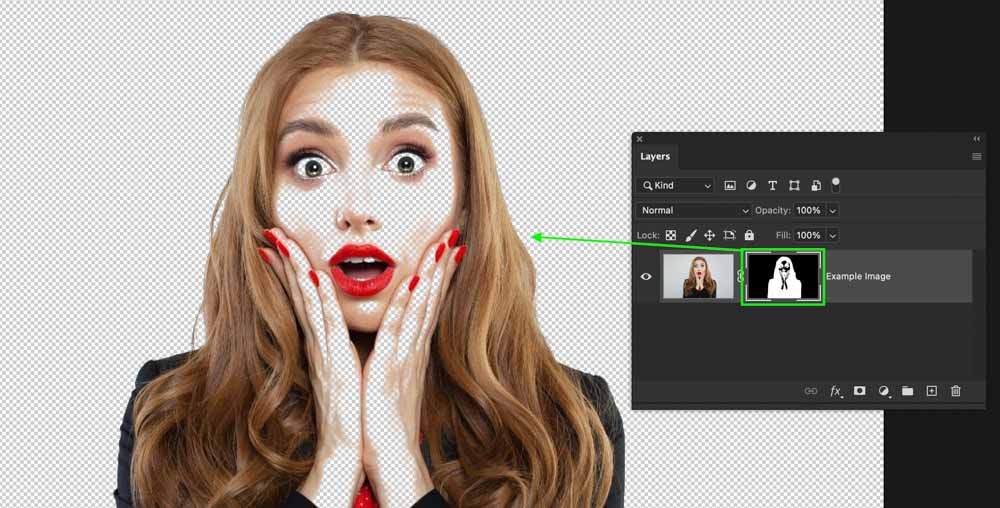
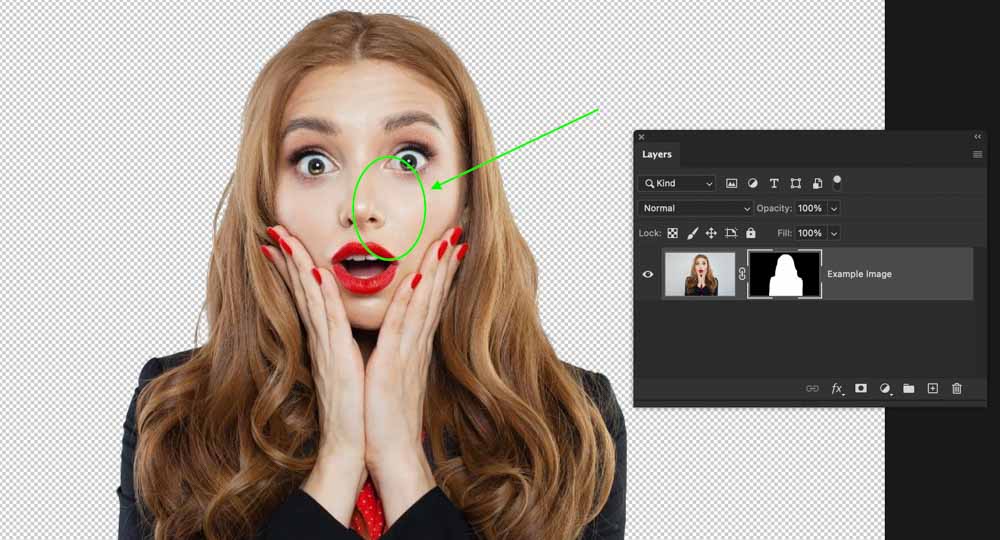
It’s possible that Photoshop erred and accidentally deleted a portion of your image that you meant to save. Using your layer mask, you may quickly change this whenever you want.
A layer mask should first be chosen by clicking on it.
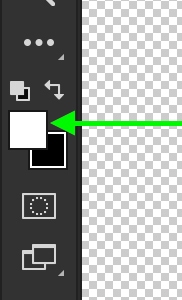
Then, to bring back a portion of your image, use the brush tool (B) and set white as your foreground color.
Set the foreground color to black if you wish to crop out more of the picture. Now, rapidly adjust your layer mask by painting over your image to restore back any significant details that Photoshop may have mistakenly erased.
In case you’re using your phone to photoshop a lot, you might want to check out our separate list of the best photo editing apps on iPhones.
Step 5: All Done!
And with only one click, you’re left with a translucent white background! And how simple was that?
How To Remove A White Background With The Magic Wand
Use the Magic Wand Tool to erase a white background by selecting the tool (W) and clicking on the background layer. Set the tolerance to 25 and the sample size to “Point Sample” in the tool’s options, then choose “Anti-alias.” After selecting the white background with a click, make it transparent by pressing Delete.
The Magic Wand Tool excels at selecting items based on hues that are similar throughout your photographs. Another fantastic technique to utilize is to remove a white background. The only issue is that certain settings are necessary for it to operate properly.
The methods below provide all the information you require to use the Magic Wand Tool to eliminate a white background.
Step 1: Select The Magic Wand Tool
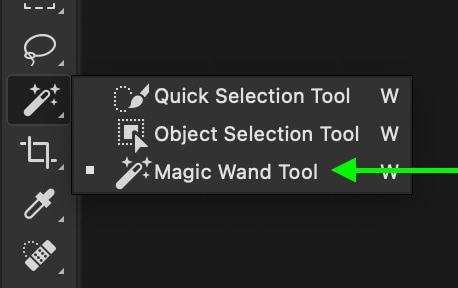
Simply hit W on your keyboard to open the Magic Wand Tool, or look for it on your toolbar.
It could be covered by other tools, such as the fast selection or object selection tools, if you cannot see it. You may access more tool choices by clicking and holding the tool icon. A magic wand tool should be chosen.
Step 2: Set The Sample Size To “Point Sample”

Go to the upper options bar with your tool chosen and change the Sample Size to “Point Sample” or “5 By 5 Average.” You can select from these choices how much of the color you sampled will be taken into account.
The ideal choice for “point sample” is a graphic with a solid white background. A 5 by 5 average will offer a greater choices, though, if you had a white background that was photographed in a studio and has varying tones of white.
Step 3: Set The Tolerance To 25

Set the tolerance to 25 after that. This is a great middle value that gives some leeway from the original sampled hue, which in this case will be white. It would be beneficial to increase this to 50 or 60 if your background has more than one shade of white.
Step 4: Check Off Anti-alias
Make sure Anti-alias is selected in the last configuration choice and leave the other two unchecked.

Step 5: Click On The White Background To Create A Selection

The enjoyable part is finally here. Click on the white background to make a selection after making sure all your settings are correct. When you click, Photoshop will sample the nearby colors and look for corresponding hues in your image to add to the selection. White is a very simple color to choose, thus Photoshop does a fantastic job making an exact selection.
Step 6: Click The Layer Mask Icon To Apply Your Selection
It’s time to add it to a layer mask to make the white background translucent as you still have an active selection. Select your picture layer, then click the layer mask icon in the Layers Panel’s bottom-left corner.
To invert your layer mask and make the subject visible once more, hit Command or Control + I.
The image background layer will now be completely eliminated, and your pick will be added to your mask. The benefit of layer masks is that, if necessary, you can go back and adjust them afterwards.
Step 7: Admire Your Transparent Background!
![]()
You’ve successfully made your white background transparent and deleted it by following these procedures. It’s time to enjoy the splendor of your superb Photoshop abilities!
How To Remove A White Background Using Select Color
For deleting every instance of one color in a picture, including white, the pick color range tool is ideal. You may rapidly make a white background translucent with the help of the procedures shown below in only a few clicks.
Step 1: Go To Select > Color Range
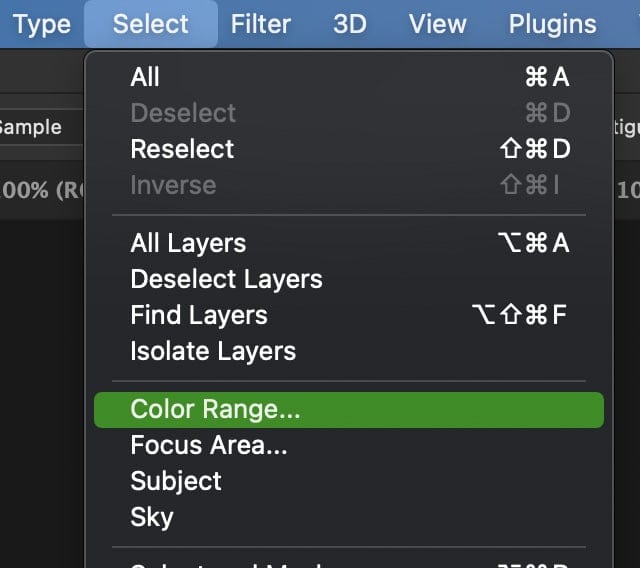
Go to Select > Color Range after selecting your picture layer to get started.
Step 2: Click The White Background To Sample It
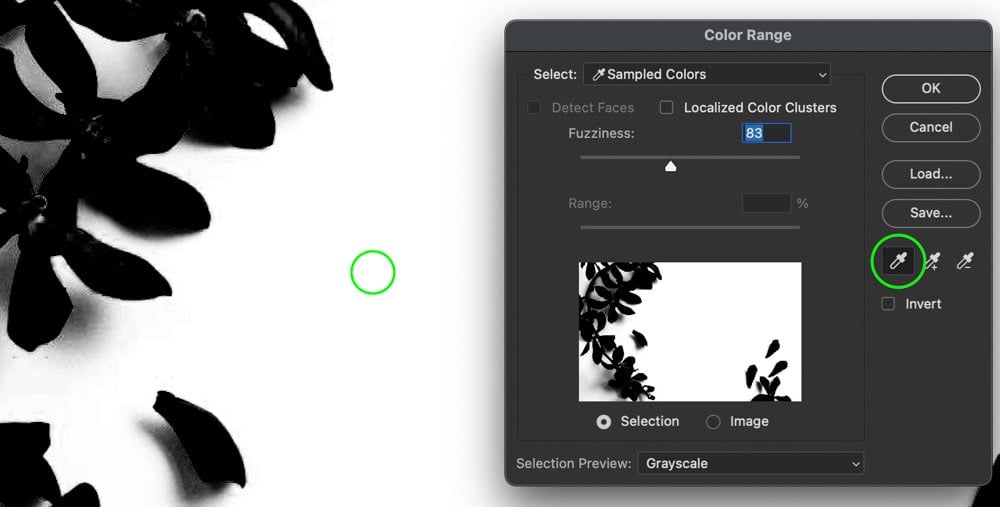
You will immediately have the eyedropper tool chosen in the dialogue box that displays. The color you wish to base your pick on has to be sampled right now. That is white in this instance.
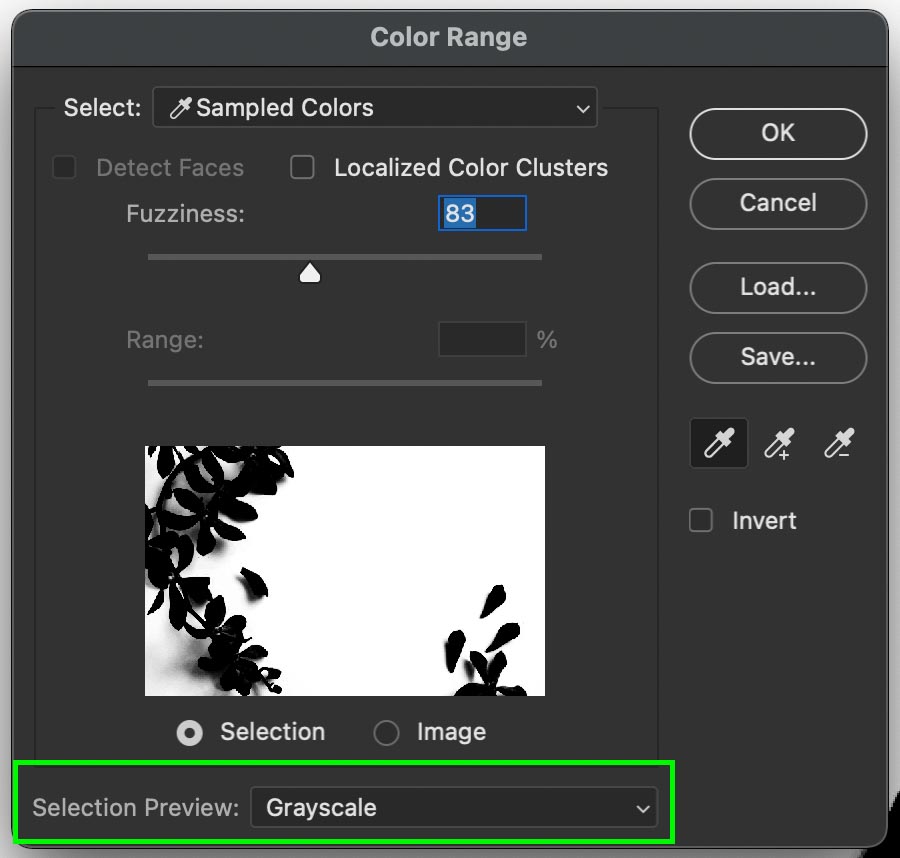
The selection preview will alter to display the white background as completely white when you click on it.
White is fully visible in this selection preview just like it would be in a layer mask, while black is fully translucent. You can see that in my case the entire background is now white.
The white background may be made white by sampling it, which will make the subsequent selection procedure simpler.
Step 3: Add Or Subtract From Your Sample To Refine It
Great if you have made the ideal decision with just one sample! Go on to the following action. You must refine your choice if the background isn’t entirely white and it doesn’t appear quite appropriate.
Clicking on a new location by default will reset your whole sample. Using a few simple keyboard commands, you may add to or delete from this sample after you have a fair basic representation of the white background in Photoshop.
Press Alt or Option while clicking on the colors you don’t want Photoshop to sample to eliminate them from your sample.
Shift-click on the shades of white Photoshop might have overlooked to add to your sample.
Step 4: Adjust The Fuzziness Slider
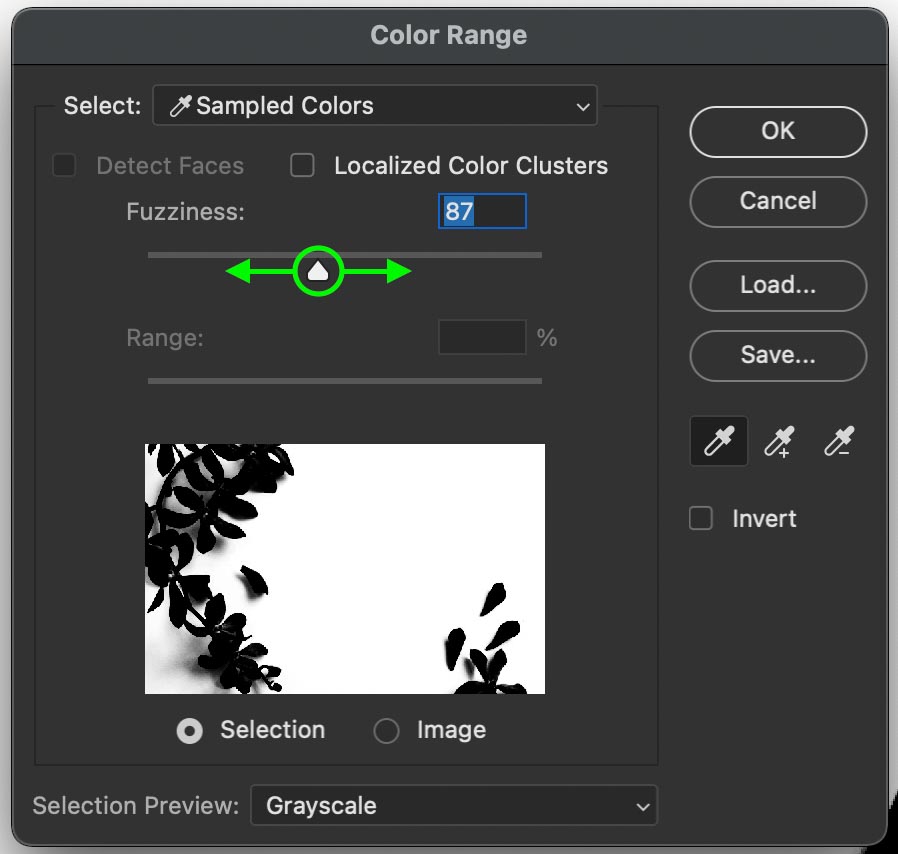
The fuzziness slider regulates the tolerance of which hues are introduced to your sample as a last way of improvement. If you have several colors of white, moving the fuzziness slider up will make them all available for choosing.
Setting the fuzziness to 0 is where I prefer to start, then I like to increase it from there. This eliminates the need for guesswork by letting you see exactly what is happening. Naturally, the fuzziness value needed for each image will vary, so experiment with this slider until you find the right one.
Setting your Selection Preview to Grayscale at this point will help you see what is selected. Make everything that you don’t want to erase dark for the time being.
Step 5: Invert Your Selection Area

Click the invert option once all of your sample settings are correct and the white background has been thoroughly sampled.
The white background will now be gone, but your topic will still be visible on your choice after doing this since it will reverse the colors!
Step 6: Press OK To Create A Selection
To create a new selection out of your samples, click OK now.
Step 7: Add The Selection To A Layer Mask

Apply a layer mask to your picture layer while your selection is active.
Your choice will be applied to the layer mask, which will transparentize the white background in Photoshop. Similar as previously, you may quickly change your mask if necessary by painting it black (transparent) or white (visible) with the Brush Tool.
Step 8: You’re Done!

You’ve just mastered a new, quick method for erasing white backgrounds in Photoshop. This technique may be used to remove colorful backgrounds in addition to white backgrounds.
How To Remove A White Background With The Magic Eraser Tool
The Magic Eraser Tool is comparable to the Magic Wand Tool, with the exception that it doesn’t operate in a destructive manner.
This tool permanently removes the background rather than producing a selection to be added to a layer mask.
If you don’t want to mess with masks and want a simple white background removal method, this is quite helpful.
Step 1: Select The Magic Eraser Tool

Press the E key on your keyboard to bring up the magic eraser tool. Simply click and hold on the background eraser tool in your toolbar to show the magic eraser tool if this doesn’t choose the right tool.
Step 2: Set The Tolerance To 25 Or Higher

Go to the upper setting bar while the tool is active and increase the tolerance to 25 or higher. A larger tolerance will yield better results if your image has more hues of white.
Step 3: Check Off Anti-alias

Then select Anti-alias, leaving the other options unchecked.
Step 4: Set The Opacity To 100%

Finally, if it hasn’t already been done, set the opacity to 100%. Your background erasing changes won’t completely erase the white background in Photoshop if they don’t have 100% opacity.
Step 5: Click On The White Background To Erase It
Click on the white background to sample and remove it from your layer after ensuring that all of your parameters are correct and that your picture layer is chosen. Photoshop will sample the color beneath your mouse each time you click and look for colors to delete. Remember that all of these modifications are permanent because this program removes your background.
Press Command + Z (Mac) or Control + Z (PC) to reverse an unintentional deletion of anything you meant to preserve.
By immediately deleting the white background from your layer, you have now been successful in getting rid of it.
How To Remove A White Background With Channels In Photoshop
Channels are the last technique for erasing a white background in Photoshop. All types of photographs may be effectively processed using this technique, but complex topics particularly shine.
This method will offer top-quality choices around difficult edges, such as those in a graphic with a lot of text or a picture with flyaway hairs.
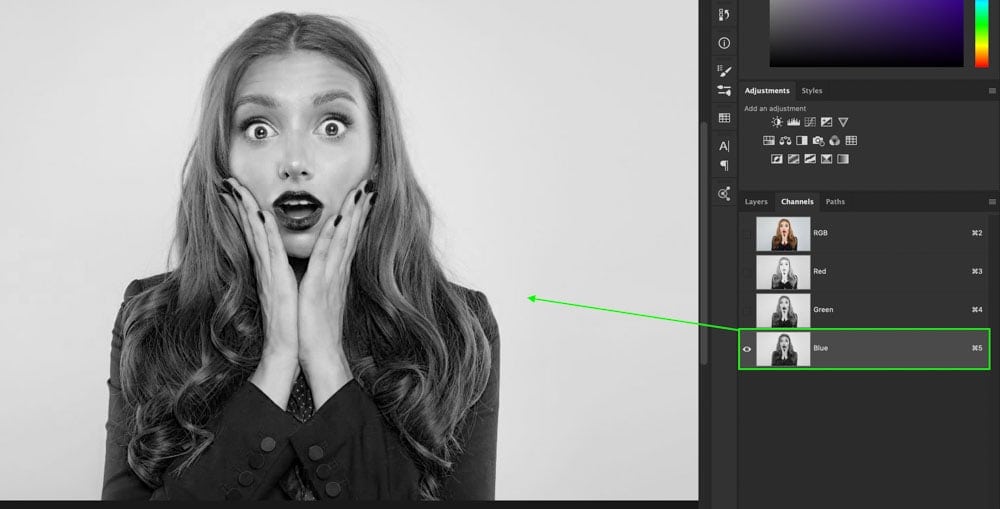
Step 1: Access The Channels Panel
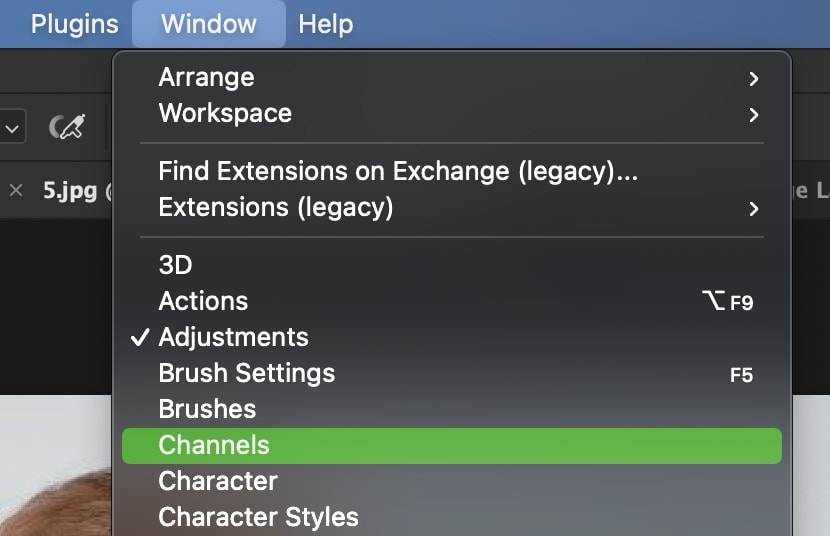
Initially, open the Channels Panel, which is often located next to your Layers in workspaces.
To see it if you can’t see it, select Window > Channels.
Step 2: Duplicate The Channel With The Most Contrast
Red, Green, and Blue are the three distinct color channels that are displayed on the Channels panel. According to the colors in your specific image, the contrast in each channel will change. You can quickly see the difference in each of these channels by switching between them.
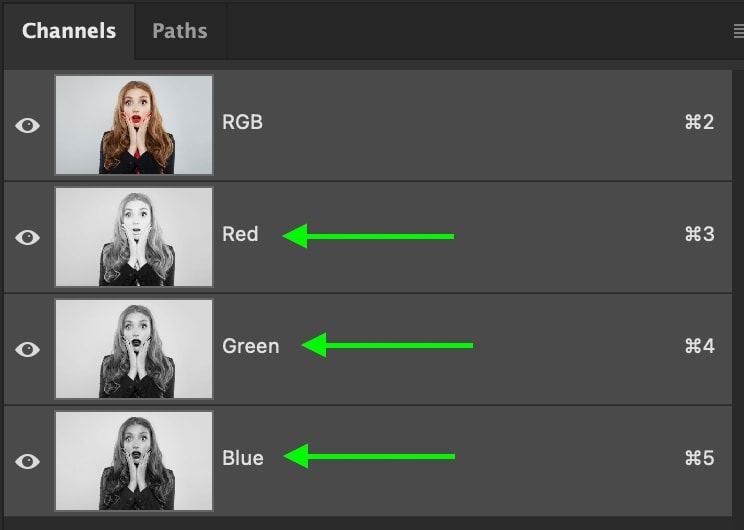
The channel with the biggest contrast should be chosen after looking through your selections. Or, the channel with the brightest whites and the deepest blacks. The more the better here, as you’ll need this contrast to make a selection and get rid of the white background in Photoshop!
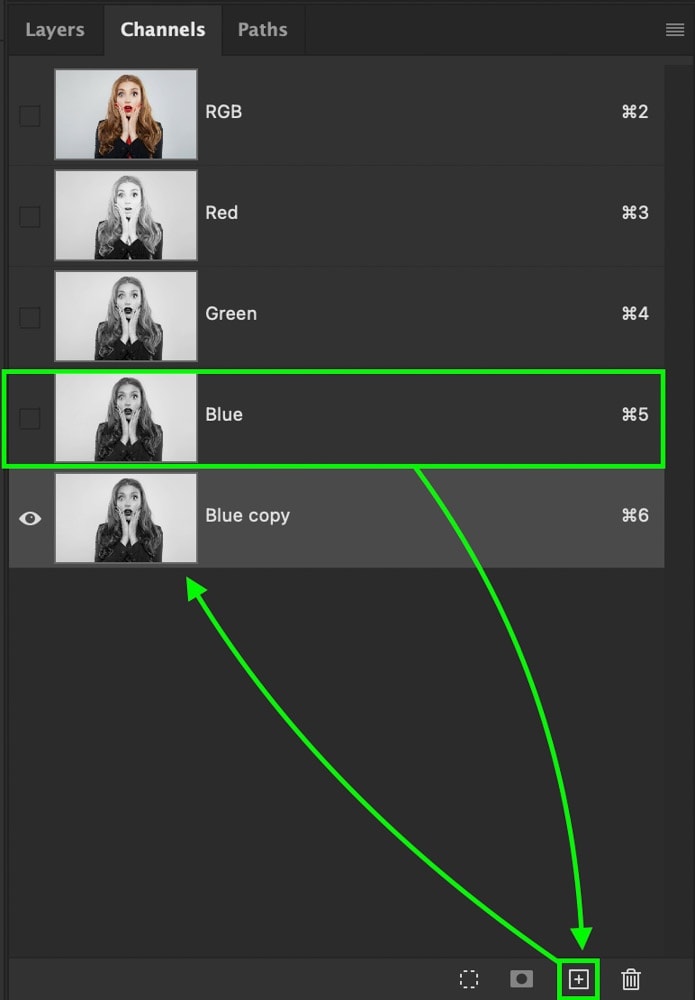
After determining which channel has the maximum contrast, click and drag it to the icon for a new layer to duplicate it. You now have a channel copy layer, which you may use to start working with in the following step.
Step 3: Add A Levels Adjustment To Your Duplicated Channel
To perform levels adjustments while selecting the duplicate channel layer, use Command + L on a Mac or Control + L on a PC. Drag the shadows to the right and the highlights to the left in the dialogue box for levels that display.
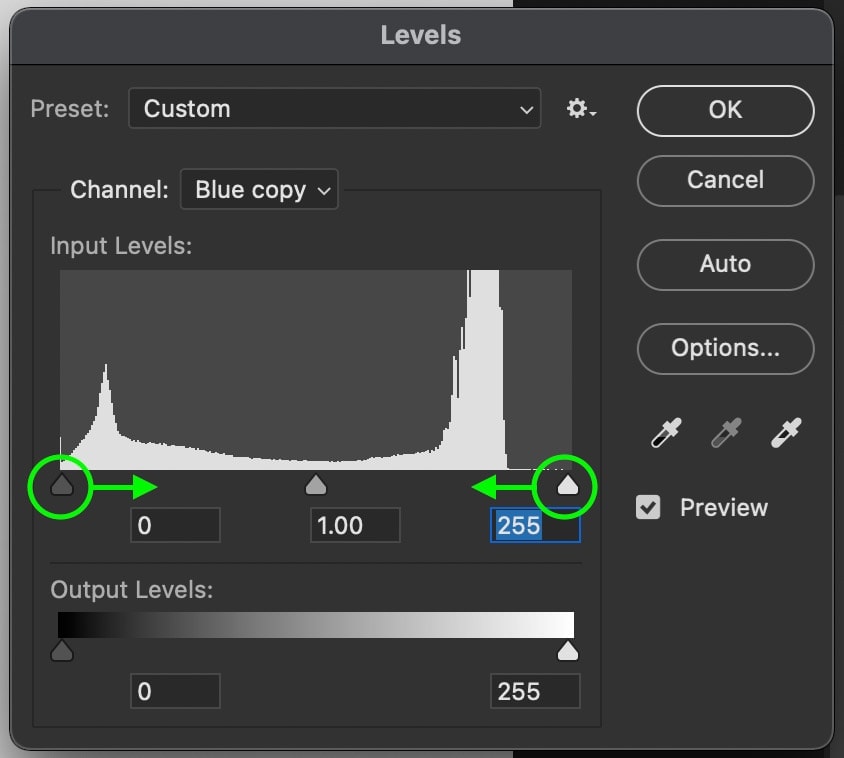
The objective is to increase the contrast in your shot until your subject is fully black and the background is entirely white. Get it as nice as you can since in some circumstances you won’t be able to accomplish this without white or gray patches. This can be changed later.
Click OK to save your modifications after determining how many levels to edit for your image.
Step 4: Turn The Duplicated Channel Into A Selection
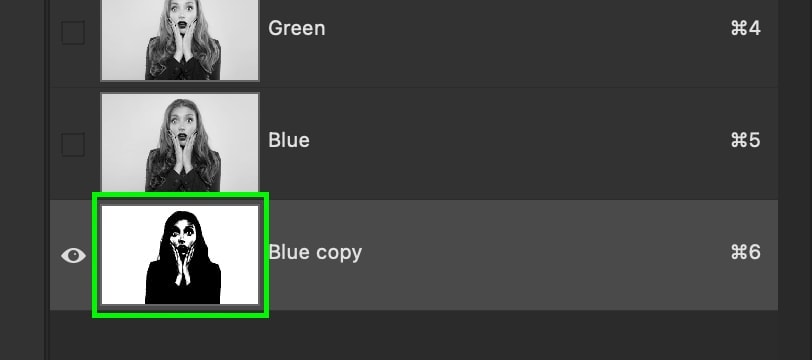
Your duplicated channel must now be made into a selection. Simply click on the thumbnail for your channel layer while holding down the Command or Control key. This will make a selection out of the black and white on your channel.
Step 5: Apply The Selection Onto A Layer Mask
Return to your Layers Panel and click on your picture layer while your selection is still active. To apply the selection to a mask, click the layer mask button.
To invert your layer mask, press Command + I (Mac) or Control + I (PC) when it is selected. This will make the background white disappear.
If your image looks anything like mine, there are still some translucent regions. Fortunately, this can be fixed by choosing the Brush Tool (B) and making white your foreground color. The translucent portions of your subject should now be painted over to restore the pixels and eliminate the transparency.
You’ve now mastered the fifth method for using Photoshop to remove a white background from a picture.
How To Export Your Image With A Transparent Background
You probably want to export your shot with a transparent background now that you have made your white background translucent. Fortunately, exporting to PNG just takes a few seconds!
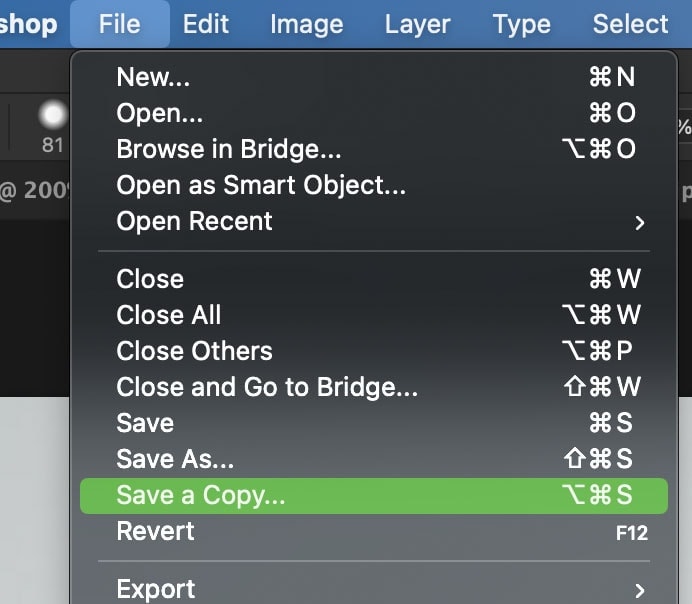
Once your white background removal is complete, select File > Save A Copy.
Then select PNG as your file format. And decide where on your computer to save the file.
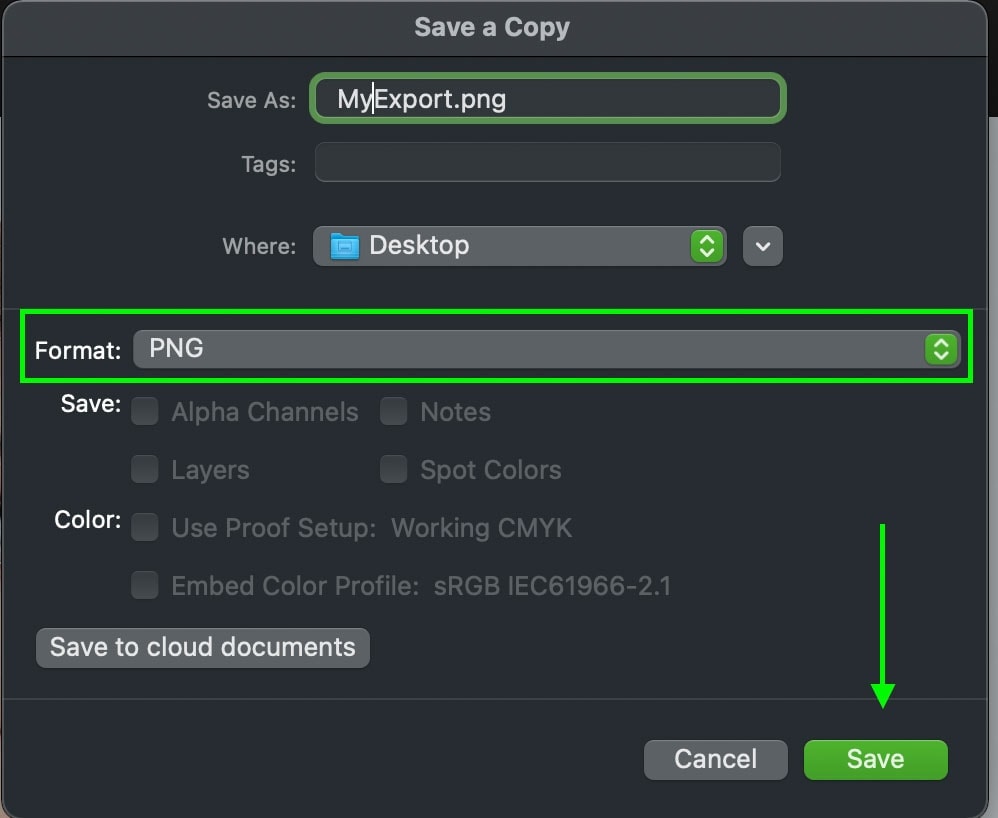
To export your photo as a PNG image and keep the translucent background, click Save just now. Your cut-out image may now be used in other projects without you having to worry about the bothersome white background in Photoshop!
Why using a White Background for Photography Makes Sense
White backgrounds are excellent for showcasing your goods, but the major benefit is that they may help you save a ton of money and time. When using a white background, you can:
Remove the background fast and easily. White is the best contrast you can have against a subject or object, making it quicker and more precise to remove and replace the white background in Photoshop, regardless of the tool you use.
Promote your goods year-round; your Christmas ad won’t be successful if you use the same picture of a sunny beach. By maintaining a plain background, you may utilize the picture throughout the year and change the graphics or photo backgrounds to fit the occasion.
Save time while editing – getting rid of a white background in Photoshop is simple and will speed up the process because you won’t need to touch up the edges as much.
It’s easier to batch photograph all of your product pictures on a white background for the full year so they can be readily utilized at any time, for any event, and you’ll save money by avoiding on-location expenditures. You’ll also save a ton of money by not needing to conduct four or more shoots or scout places.
Celebrate significant days like Mother’s Day, Father’s Day, Black Friday, Super Bowl Sunday, National Sibling Day, or even Love Your Pet Day. The holiday calendar has more than a hundred separate days to remember.
Conclusion: Finally Know How To Erase Your White Background Now?
Some graphic designers rely on the lasso and pen tools to pick things from backgrounds, but when the background is a plain white hue, those tools are simply not necessary. You have more than enough knowledge to remove any type of white background with the three tools we have provided in this article.
Remember that PNG and SVG are the two file types in which you may download graphics with a transparent background. You may get a free trial of Photoshop from the Adobe Creative Cloud website if you don’t already have the most recent version.
If you’re really keen on photoshop, you’ll want to know how to buy photoshop from our separate article.